Tuesday, April 30, 2013

Five Little Cookies in the Bakery Shop

I made a felt story to use on our felt board to go along with upcoming baking activities that I have planned. I found two rhymes/songs that I can use with them, Five Little Cookies in the Bakery Shop and Five Little Cookies. I cut out 5 circles and decorated them with icing (glitter glue), which I color coded to go with the bottom song. 


Five Little Cookies in the Bakery Shop

Five little cookies in the bakery shop
Five little cookies with sugar on top
Along came a man with a penny in his hand
Click, clock, click, clock, click, clock, click, clock
He took one cookie and away he ran


Four little cookies in the bakery shop
Four little cookies with sugar on top
Along came a man with a penny in his hand
Click, clock, click, clock, click, clock, click, clock
He took one cookie and away he ran


Three little cookies in the bakery shop
Three little cookies with sugar on top
Along came a man with a penny in his hand
Click, clock, click, clock, click, clock, click, clock
He took one cookie and away he ran


Two little cookies in the bakery shop
Two little cookies with sugar on top
Along came a man with a penny in his hand
Click, clock, click, clock, click, clock, click, clock
He took one cookie and away he ran


One little cookie in the bakery shop
One little cookie with sugar on top
Along came a man with a penny in his hand
Click, clock, click, clock, click, clock, click, clock
He took one cookie and away he ran


But we’re not done yet:
No little cookies in the bakery shop.
No little cookies with sugar on top.
Along came a man with a penny in his hand.
Click, clock, click, clock, click, clock, click, clock
He took one look
And away he ran


I color coordinated the icing to go along with this one:

Five Little Cookies
Five little cookies with frosting galore,
Mommy ate the white one, then there were four.

Four little cookies, two and two you see,
Daddy ate the pink one, then there were three.

Three little cookies, but before I knew,
My sister ate the blue one, then there were two.

Two little cookies, oh, what fun!
My brother ate the green one, then there was one.

One little cookie, watch me run!
I ate the red one, then there were none!


Monday, April 29, 2013

Fizzing Bath Paint

Bath time has always been a favorite for my kids, but lately, we have been taking it to a new level.
We have had many baths with bath paint and a few glow baths with glow paint, I had to come up with something new for bath time today. We made Fizzing Bath Paint today! My boys loved it, it was a hit! It was simple to make and was ready in under 2 minutes.
 
All you need is shaving cream, baking soda, and vinegar. 
 
 
In a bowl, I mixed shaving cream with a lot of baking soda. I didn't measure how much, but it was enough to make a thick paste. I added a little food coloring just for fun.

 
I gave it to the kids to smear on the bath walls along with a spray bottle filled with vinegar.

They loved the idea of spraying it...
 
 
Then we watched and listened as it fizzed.
 
They enjoyed this little bath experiment, I am sure your kids will too!


Sunday, April 28, 2013

Bath Time is Fun When it Glows Blue!


Tonight, we had our second glow bath, this one was blue. Pretty cool, huh? The kids definitely thought so! 


The blue glow bath is quite a bit easier than the yellow one, at least I think so.
All I did is fill the tub with water like I normally would and added 5- 2 liter bottles of Tonic Water.
Turn the lights off and the Black Light(I picked mine up at Wal-Mart for under $11) on and you have yourself a Blue Glow Bath!


Make some glowing Bath Paint to go along with it.
I used a little bit of neon acrylic paint instead of food coloring, but neon food coloring would work too.


By the time the kids were finished with the bath paint, not only was the entire bathtub glowing, but so were they!
The beauty of it all is that it all washes off and goes down the drain!
 
For more glow bath fun, check out the yellow Glow Bath!


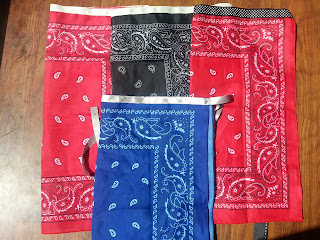
Sew or No Sew Bandana Apron


My kids have been wanting aprons for the  longest time. Finally, they got them.
This week, I made the simplest and most inexpensive aprons that I've ever made. I picked up my supplies at dollar store and was able to make 2 for $2.00! All you need is a bandana and coordinating ribbon. There is minimal sewing involved, or if you prefer, you can use heat and bond tape.


First, cut your ribbon long enough to wrap it around your waist and tie it in a bow. If you are going to sew, sew the ends so that the ribbon does not fray.
For the no sew apron, use some fray check on the ends so that they do not fray. 
 
 
Pin the middle of the ribbon on the bandana and sew it on.
If you are using heat and bond tape cut a piece the size of the apron and iron it on to the front of the bandana. Remove the paper backing from the Heat and Bond and center your ribbon on the center of the bandana. Turn ribbon and bandana over to iron together.
 
 
Quick and simple, huh?
These were so simple, I made 2 more for swaps that I am participating in on Swap-bot.
I whipped 4 of these up in no time!
 

Blast Off-- Our Space Sensory Tub


5-4-3-2-1 Blast Off!
That's all you heard this morning after we set up our Space Sensory tub. My son has been begging for a space sensory tote-- well, he finally got it! I used black aquarium rocks for the filler. The tote has a felt Earth and spaceship, aliens, alien fingers, glow in the dark stars, shooting stars, astronauts, flying saucers, space beads, star beads, alien peg people, and so much more! After my son started playing with it, he added his own contribution-- Buzz Lightyear! As I come up with more ideas, we definitely continue to add to it. 
 
 
For those of you that do not know what a sensory tub/tote is, it is a tub or a bin that you fill up with various items to let your child be hands-on. Sensory activities provide children with another meaningful avenue of learning.

Saturday, April 27, 2013

Sensory Fun with Ivory Soap

Today, my oldest went hiking with his Boy Scout Troop. My youngest was heartbroken, I had to find something to put a smile on his face. A bar of Ivory Soap did it. That .33 cents I spent to buy the bar of soap gave my son over 2 hours of enjoyment and play! This was an awesome little "experiment," not only was my 4 year old amused and amazed, but I was too!


All you need is a bar of Ivory soap.


Unwrap it and cut it into 4 pieces.
 

Microwave one piece at a time on a microwave safe plate for 30 seconds and watch it grow. Scrape the soap fluff into a container or sink for play.
Repeat with the remaining pieces.
 
 
Let them play and take notice of the different textures of the soap and how quickly it changes.
 

First, it is almost like a dough...
 
 
As it cools, it gets very powdery.
 

My son added some men to play with for added fun.
 

After awhile, I added 2 cups of water to the bin. The water was filled with bubbles, which he thought was great.
 

As time went by, the soapy water turned into a paste.
 
It is crazy how many different textures and consistencies you can get from a simple bar of soap!


Friday, April 26, 2013

Popsicle Stick Harmonicas

 
Today, I made another addition for our soon to be Music Sensory Tub-- Popsicle Stick Harmonicas. It took me less than 20 minutes to make 5 of these, they are super easy to make.


All you need is 2 popsicle sticks, 2 rubber bands, and a piece of paper. You will also need a pair of scissors and a pen or pencil. 


First, trace the outline of a popsicle stick on the piece of paper. Cut it out, cutting just inside of the line. The piece of paper needs to be just a bit smaller that the popsicle stick.

 
Place the piece of paper on one popsicle stick and a wrap a rubber band around one end of the popsicle stick once or twice (holding the paper to the stick) and add the other popsicle stick on top of the paper and finish wrapping the rubber band around both popsicle sticks. Do the same for the other end of the popsicle stick.
 
 
To use these, hold it and blow into it like you would a real harmonica.

Thursday, April 25, 2013

Fun with Homemade Paint


Today, we had so much fun making and using paint! It was so simple, inexpensive, and super fun to make. The kids had a blast making and mixing paint and had even more fun painting. Luckily for me, it was a beautiful day out so the boys could paint outside. 
 
We made 4 batches, each one was a different color and split into two containers. 

All you need is: 
1 Cup flour
1 Cup Salt
1 Cup Water
Food coloring
 
 
Combine all of the ingredients in a large bowl or container.
 
Add enough food coloring to achieve the color desired.
 
 
Have fun!!!
 
 
They started with paint brushes....

 
But quickly switched to using their hands!


 Things progressively got messier and messier! LOL
 
 
 They really had a blast!


BONUS!!!  The paint did wash completely out of their clothes!


Wednesday, April 24, 2013

Our Butterfly Sensory Tub


My son was so happy that we set up his Butterfly Sensory Tub today!
It has anything and everything to do with butterflies and caterpillars!
There are plastic, fabric, foam, and felt butterflies. A beaded butterfly that my son made himself, a pom pom caterpillar, some flowers, a felt caterpillar and more.
We colored some rice yellow for the filler.
Eventually, we will combine these items with our Spring Sensory Tub and make it on huge sensory tub.
 
For those of you that do not know what a sensory tub/tote is, it is a tub or a bin that you fill up with various items to let your child be hands-on. Sensory activities provide children with another meaningful avenue of learning.

Free Ultimate Rainy-Day Activity Book

Head on over to the Melissa and Doug Blog to download their free Ultimate Rainy-Day Activity Book. It includes a bunch of fun inside play ideas, rainy day crafts, and activities to keep your little one busy indoors. Download yours Here.

Tuesday, April 23, 2013

Our Spring Sensory Tub

For those of you that do not know what a sensory tub is,
it is tub or a bin that you fill up with various items to let your child be hands-on. Sensory activities provide children with another meaningful avenue of learning. The tub can have a theme or include random miscellaneous items.
 
This is our Spring Sensory Tub. I think it one of my son's favorite sensory totes so far. It includes plastic bugs, felt bugs, butterflies, flowers, bunnies, bug catching kits and net, clay flower pot, mini carrots, and more! I used blue rice for the filler. My son is having a blast with the rice, it is like an indoor sandbox! He loves filling and dumping things!


My Bacon Potluck Playdate-- Pasta all' Amatriciana

Last week, I hosted a dinner playdate-- A Bacon Potluck!! Can you say yum? Who doesn't love bacon? My family is a huge fan, so this seemed like a great idea. Every dish we shared had bacon in it. We had BBQ Chicken wrapped in bacon, Pasta all' Amatriciana, Bacon Cheddar Cornbread, Bacon Brownies, and Chocolate Bacon Croissants. To top it all off, we dipped pieces of bacon in chocolate fountain, a must try if you have never tried it! It may not have been one of my healthiest playdates, but it sure was one of the most delicious playdates! I thought it would be fun to share some of the recipes with you so you can try them yourself! 
 
Pasta all' Amatriciana
 

Ingredients

  • Salt
  • 1 pound penne pasta
  • 1 tablespoon extra-virgin olive oil
  • 6 slices lean peppered bacon, chopped
  • 1 large red onion, chopped
  • 4 cloves of garlic, finely chopped or grated
  • 1 cup chicken stock
  • 1 (28-ounce) can crushed fire roasted tomatoes
  • Black pepper
  • A handful flat leaf parsley, chopped
  • Shredded sharp white Cheddar, to pass at table

Directions

Heat water to boil for pasta, season with salt and cook pasta to al dente.
Heat a deep skillet over medium-high heat with extra-virgin olive oil, a turn of the pan. Add bacon and crisp 4 to 5 minutes then add onions and garlic cook to soften, 5 to 6 minutes.


 Stir in stock then tomatoes and season with pepper to taste.


Simmer sauce 15 minutes.
Toss pasta with sauce and parsley.
Serve with grated sharp white Cheddar.
 
 
Dinner is served!


My Bacon Potluck Playdate-- Bacon Brownies

Last week, I hosted a dinner playdate-- A Bacon Potluck!! Can you say yum? Who doesn't love bacon? My family is a huge fan, so this seemed like a great idea. Every dish we shared had bacon in it. We had BBQ Chicken wrapped in bacon, Pasta all' Amatriciana, Bacon Cheddar Cornbread, Bacon Brownies, and Chocolate Bacon Croissants. To top it all off, we dipped pieces of bacon in chocolate fountain, a must try if you have never tried it! It may not have been one of my healthiest playdates, but it sure was one of the most delicious playdates! I thought it would be fun to share some of the recipes with you so you can try them yourself! 

Bacon Brownies
*This is one of my super simple "cheat" recipes :)
Ingredients:
1 Box of Brownie Mix plus the ingredients specified on the box
10 slices of bacon, cooked, blotted on paper towels, & chopped
(I used pre-cooked bacon pieces that came in a jar)

Directions:
Prepare brownie mix as specified on the box and mix in the pieces of bacon.
Bake as specified on the box.


It is that easy!
A quote from my husband-- "Why would anyone ever make brownies without bacon?"

Monday, April 22, 2013

My Bacon Potluck Playdate-- Bacon Cheddar Cornbread

Last week, I hosted a dinner playdate-- A Bacon Potluck!! Can you say yum? Who doesn't love bacon? My family is a huge fan, so this seemed like a great idea. Every dish we shared had bacon in it. We had BBQ Chicken wrapped in bacon, Pasta all' Amatriciana, Bacon Cheddar Cornbread, Bacon Brownies, and Chocolate Bacon Croissants. To top it all off, we dipped pieces of bacon in chocolate fountain, a must try if you have never tried it! It may not have been one of my healthiest playdates, but it sure was one of the most delicious playdates! I thought it would be fun to share some of the recipes with you so you can try them yourself! 
 
Bacon Cheddar Cornbread
 
Ingredients:
1 box of Jiffy Corn Muffin Mix
1 Egg
1/3 Cup of Milk
1 Can of Corn, drained
1 Can of Cream Corn
1 Cup of Cheddar Cheese
5 Slices of  Bacon, cooked , blotted with a paper towel, & chopped
 
Directions:
Combine all ingredients in a large bowl. Pour the mixture in an 8X8 baking pan.


Bake at 400 degrees for 20-25 minutes or until done.


ENJOY!
 
*This recipe doubles easily and to make life easier feel free to use precooked bacon.


Sunday, April 21, 2013

Making Music with Straw Flutes


My little guy and I are working on putting together a Music Sensory Tub. I figured these easy Flute Straws would be a fun addition to the tote.
 
 
They are so quick and make easy to make, all you need is some plastic straws, tape, and a pair of scissors.
 
 
Do not cut the first straw, keep it the full size. Cut off about an inch from the second straw, two inches from the third straw, three inches from the fourth store, and so on.
 
 
Line them up together and use a piece of tape to tape them all together. In the picture, the tape is underneath all of the straws and stuck to my thumb, but it is impossible to see the clear tape-- Sorry!
 
To use the flutes, do not put your mouth on the straws, blow into the holes of each of the straws and listen to the different sounds.
 
Here is my son having a blast with his straw flute.